Homeowner's Guide to Tree Maintenance

Learn to stake trees and prune trees like the professionals.

How to Stake a Tree

Tree Staking

When people refer to tree maintenance, it normally means staking or pruning. Both are great practices that can extend the life of your trees, but they also require a bit of knowledge to do properly. Here’s what you need to know:


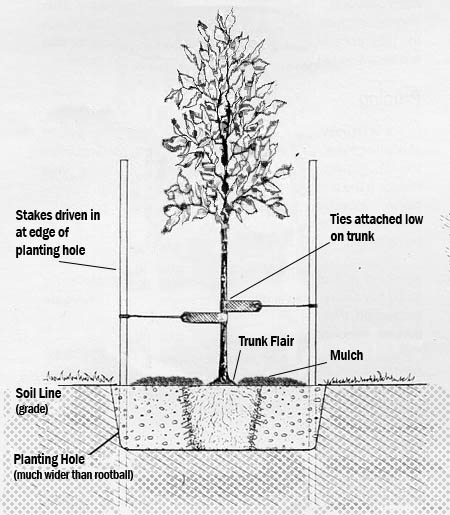
It is common to stake newly planted trees throughout the US. When properly done, staking helps hold the roots of a newly planted tree firmly in the soil until the roots become better established and are able to securely anchor the tree in place. Staking allows trees to withstand strong winds and develop extra strength over the first 6-12 months (sometimes 2 years if necessary).

Quick tip: Multi-trunk, larger box sizes, and low branching trees commonly do not need to be staked if their structure is stable.

Do the following when staking:

  • Use two 2″ diameter tree stake lodge poles, placing one on each side of the tree with two properly sized, hose protected plastic coated wires that run between the two stakes around the tree.
  • Pound the stakes firmly into the ground, outside the rootball, to a depth of at least 24″.
  • Remove the stakes when the main trunk of your newly planted tree equals 3/4″ the size of the lodge pole or in this case, 1 1/2″ in diameter or when the tree exhibits stable growth (stable growth would be shown when you can wiggle the tree without wiggling the rootball).
  • When removing the stake, be sure that the entire stake is removed, both above and below ground; along with the wires and hose material.
  • If you have a large win or thunderstorm, check the trees before and after to correct any staking problems.
  • Check and change hose protectors if they are interfering with the growth of the tree. You do not want the trunk to grow around the hose protectors.
  • Amount of People 1 person
  • Install Time 30 minutes
  • Removal Time Within 2 Years

Materials

  • 2” diameter lodge poles - no taller than 8’ prior to installation. We commonly find 6’ lodge poles.
  • 12 gauge plastic coated wire
  • ⅝” diameter rubber garden hose
  • Heavy duty staple gun
  • Mallet
  • Wire cutter

Instructions

  1. Use two lodge pole stakes that are 2” in diameter. Choose a stake that is made of Douglas Fir or an approved hardwood.
  2. Drive the 2” diameter stake at least 24” into firm, undisturbed soil below the excavated depth.
  3. Place stakes outside of the rootball.
  4. The height of the stake will vary depending on the support needed for each tree.
  5. Position your ties in a way that it will prevent damage to any limbs or the cambium (cambium is a fancy term for the growing part of the trunk). You don’t want the trunk to grow into your ties.
  6. Be sure to place your stakes at 90 degrees to prevailing (most common wind direction) winds.

Do Not:

  • Do not substitute your 2″ lodge poles for smaller alternatives like rebar, metal, or smaller stakes.
  • Do not drive the stakes into the rootballs.
  • Do not break the stakes at finish grade (ground level) and leave them in the ground. Remove the entire stake.
  • Do not break the stakes at finish grade (ground level) and leave them in the ground. Remove the entire stake.
  • Do not refill stake holes with decorative rock or rocky soil. When buried near the rootball, rocks create excessive heat build up that can damage the roots of young trees.
  • Do not allow wires to hang loosely in order to prevent injury.
  • Do not leave stakes on too long. Leaving stakes on too long will create damage to the tree.
  • Do not stake multi-trunk trees unless specifically directed to.

How to Prune a Tree

Do's

  • Allow lower branches to continue growing on young trees to develop a stronger trunk caliper.
  • Retain lower branches on a new planted tree for at least the first growing season. Then moving forward, remove the minimum amount of branches to maintain a neat appearance. The less cutting throughout the first three growing seasons the better.
  • Retain a natural shape when trimming the tree, cutting a minimal amount of branches to maintain a 7’ clearance height under the canopy at full maturity along walkways or according to city rules.
  • Remove limbs that obstruct sitelines or pose a risk of becoming a liability.
  • Trees provide shade. That’s why people pay a lot of money to add them to a landscape. Therefore, be sure to prune a tree in a way that you maintain shade over paved surfaces including driveways, patios, sidewalks, and parking lots.
  • Remove all diseased and dead branches.
  • Remove branches that conflict with structural limbs. Structural limbs are the branches that help form the overall canopy shape. For example, you would want to remove crossing branches and branches that rub against each other.
  • Thin the canopy of trees to create balance and allow some light to filter through to inner branches and the trunk. Plus, it also allows you plant foliage under the tree.
  • Remove limbs that are larger than 2” in diameter during the dormant season, when the tree’s growth is limited.
  • When the trees have fully leafed out in the spring, after the frost season, branches that fail to grow leaves can be removed using proper trimming.

vs.

Don'ts

  • Top or stub cut branches.
  • Remove leaf buds.
  • Prune into unnatural shapes such as boxes of spheres. This stresses the trees.
  • Lion tail tree branches (lion tailing – stripping out all of the interior foliage, leaving only a small amount of foliage on the end of the branch).
  • Prune to leave two co-dominant trunks.
  • Raise the canopy too high.
  • Flush cut limbs (flush cut – pruning cuts made as close as possible to the trunk or main branch).
  • Remove more than 20% of the canopy branches.
  • Use pruning paint sealer. (Tree pruning sealers are bad. They make it harder for your tree to recover. Plus, pruning sealers may trap moisture in the tree, which can encourage wood decay or fungi.)
  • Use anvil type pruners on living branches (using an anvil pruner will likely crush a live branch instead of creating a clean cut).

Approved Pruning Tools

  • These are approved pruning tools
    Bypass hand pruners which have 2 cutting edges to remove limbs less than ½” in diameter.
  • Loppers with 2 cutting edges – to remove limbs between ½” and 1” in diameter.
  • Hand saws to remove limbs over 1” in diameter.
  • Pole saws and pole pruners
  • Chainsaw for branches larger than 3” in diameter.

Pruning Calendar

Click each month to reveal the proper trees to prune.

January

Deciduous and Evergreen

February

Deciduous, Evergreen, and Citrus (late February)

March

Evergreen, Ficus and Citrus

April

Evergreen, Ficus and Citrus

May

Evergreen

June

Desert trees (acacia, sissoo, ironwood, mesquite, palo verde)

July

Desert trees (acacia, ironwood, mesquite, palms, palo verde)

August

Desert trees (acacia, ironwood, mesquite, palo verde)

September

Trees that are not frost sensitive

October

Trees that are not frost sensitive

November

Deciduous and Evergreen

December

Deciduous and Evergreen